Showing posts with label lacto-fermentation. Show all posts

Thursday, December 29, 2011

Kimchi

While researching ways to make sauerkraut, I came across a compelling book by Sandor Katz.  In his book Wild Fermentation, he espouses the health benefits of fermented foods.  He claims that the beneficial bacteria in these "ferments," as he calls them, are highly beneficial for our digestion and for the absorption of vital nutrients from our food.  I encourage you to read his book.
My sauerkraut was such a raving success that I became inspired to make some kimchi.  Kimchi is a cabbage pickle that is a mainstay in the Korean diet.  Besides its probiotic qualities, it is also loaded with vitamin C.

This recipe is adapted from the one in Wild Fermentation. Kimchi is crunchy and delicious and we eat it at almost every meal.
To make one quart, you will need:

sea salt
1 pound napa cabbage (also called Chinese Cabbage)
1 daikon radish
2 carrots
1 medium onion
3 cloves garlic
3 Tablespoons fresh grated ginger root
1 chili pepper if you so choose (I chose not to)


Begin by slicing the napa as thin as possible, and placing it in a large bowl.

We use napa rather than conventional cabbage, because the napa has a thinner leaf, giving a lighter texture to the finished product. 

This is a daikon radish that I purchased at my local food co-op.
It was grown right here in Northeastern Connecticut.
(Sorry about the ruler, it's the only one I could find.)
You can see that the radish is a hefty 13 inches long!

Use a box grater to grate the daikon radish.   A root vegetable such as this reaches deep into the earth to provide you with minerals and nutrients. 
Grate the carrots and mix the radish and carrots into the cabbage. I find that it's easier to mix the vegetables in the large bowl than in the crock itself.

Mix a brine of 4 cups (1 liter) water and 4 Tablespoons (60 milliliters) salt. Stir until salt is thoroughly dissolved.


Place the brine and the vegetables in a crock or food-grade plastic bucket.

Cover with a plate and add a clean jar of water to keep the vegetables submerged in the brine for several hours, until soft, or overnight. 
Drain the brine off the vegetables, reserving the brine.

Now chop your onion and garlic very fine and grate the ginger root with a spice grater. 


If you have a mortar and pestle, you can grind the aromatics together in that.  Having none, I mashed the onions, garlic, artichoke, and ginger with a fork.
Add the spice mixture to the drained vegetables, and mix well. 

Pack into one or two quart sized jars. Tamp down firmly so the brine rises to cover the vegetable mix and all air is squeezed out of cabbage mix.  If necessary, add some of the reserved brine so the vegetables are well covered.

Use a smaller jar or a small plastic bag filled with brine to press down on the vegetables, keeping them under the brine and away from contact with the air.  

Allow the kimchi to ferment in a warm place for up to a week,
checking every day:
  • Remove any foam that forms.
  • Taste the kimchi to see if it is to your liking. 
  • Keep tamping it down to be sure no air bubbles are in there. 
  • Be sure veggies are well covered with brine. 
When the ferment has reached the desired tanginess, remove the smaller jar or baggie and replace with a conventional lid. Store the kimchi in the refrigerator for up to three weeks.  Enjoy as a condiment with meals, or pack right into a sandwich or wrap!

Saturday, October 8, 2011

Sauerkraut

This year we had a good crop of Storage #4 Cabbage.  We started these cabbages from seed in the greenhouse on April 9th and put them out on June 2nd.  We put a thin row cover over the plants to keep the cabbage moths out of them.  We kept this protective cover on all summer.

In the past we've made lacto-fermented sauerkraut in quart jars, but this year we're making it in a five gallon crock.  Here's how:

Remove the outer leaves and any damaged portions from firm, mature heads of cabbage.  Wash them off and allow to drain.  We use modified laundry baskets for this purpose.  They have holes drilled in the bottom so water can drain out.

Cut cabbage into halves and quarters and remove core.  Shred with a box shredder or use a sharp knife to cut into shreds or chunks.  Ours is pretty chunky.
    
Place in a large bowl as you chop it.
We use a baby scale to weigh out 5 pounds of cabbage.

 Recipes vary as to how much salt to sprinkle on the cabbage to draw out the moisture that creates the brine in which the cabbage will ferment.  We decided on two teaspoons per pound, so we added 10 teaspoons to our 5 pounds.  Then we stirred the salt in well and let the cabbage sit until it looked wet and shiny.
Next pack an even layer of cabbage into your crock, about two inches thick.


 Tamp it down with your fist or a sturdy kitchen implement.  We use a sturdy little glass vase.  The tamping packs the kraut tight and helps force the water out of the cabbage.  Keep adding cabbage in two inch layers, tamping them down as you go.

I'm not sure if this photo conveys this, but the sides and bottom of this vase are very thick:
thicker than a canning jar, for instance.
 Once all of your cabbage is packed in, tamp it down and let it rest until you can see the level of liquid is up to the top of the cabbage.*
Place a plate on top of the cabbage and weigh it down with a jar full of water.  This will continue to force water out of the cabbage and keep it submerged under the brine.


Cover the crock with a clean dish towel to keep the dust and flies out.  A room temperature of 68 - 72 degrees is best for fermenting cabbage.  Check the kraut every day or two.  The volume reduces as fermentation proceeds.  As a result of contact with air, sometimes mold will appear on the surface. Skim this off as best you can with a spoon. (Don't worry if you can't get it all - this is just a surface phenomenon and your kraut is safely under the anaerobic protection of the brine.)  Rinse off the plate and the weight before returning them to the crock.
The kraut will be tangy in just a few days.  You can scoop out a jarful to keep in the fridge for easy consumption as soon as you like.  Just be sure to repack the kraut carefully: make sure the kraut is packed tightly in the crock, the surface level, and the dish and weight are clean.

*Some cabbage, especially if it is old, contains less water.  In this case, the level of brine may not be visible by the time you need to move on to other projects.  Go ahead and cover with the plate and weight and dish towel.  Press down on the weight.  Repeat every hour or so, until the brine rises up to the plate.  If the brine is not up to the plate by the next day, make up a brine solution of 1 tablespoon salt per cup of water. Add enough of this salt water to bring the level of brine up to the plate.    

Enjoy your sauerkraut: the taste and the benefit to your digestion that comes with adding lacto-fermented foods to your diet. 

References for this posting are:
WIld Fermentation by Sandor Ellix Katz

Monday, August 15, 2011

Robbie Heidinger Lacto-fermentation Crocks


On a recent visit to to Western Massachusetts to visit friends, we stopped by the home and studio of ceramic artist Robbie Heidinger.  Kurt and Robbie are old friends and we wanted to pay a surprise visit to her open studio event.

As serendipity would have it, she was featuring a new collection of...would you believe... fermentation crocks.

Like everything Robbie creates, these are absolutely gorgeous.  As well as her mastery of handbuilding and glazing technique, she has an amazing eye for color, line and texture.

These crocks are unique in that the lid fits inside the crock, rather than resting on top.

Thus, when you fill the crock with vegetables and brine, the top will weigh down the veggies and keep them "underwater." This is a tad more elegant than the canning jar on a plate solution described in my posting of lacto-fermented pickles so if you budget allows, go for it!

You can visit Robbie's website at http://www.robbieheidinger.com/.
                                                                                                                                                                    In the garden in Westhampton...  

Lisianthus

Hydrangeas


Wednesday, July 13, 2011

Lacto fermented pickles


wild grapes
For this pickling project you will need:
A large ceramic crock or food-grade plastic bucket
3-4 pounds fresh cucumbers
8 - 10 grape, oak, black cherry, or horseradish leaves
6 Tablespoons Kosher salt or sea salt
1/2 gallon pure spring or well water (no chlorine or water softeners)
2-3 cloves of garlic, peeled
4-5 heads of fresh dill
1 teaspoon peppercorns

A pickle crock is ideal, of course, but you can also make use of a food-grade plastic bucket. The one you see here is recycled from the Food Co-op, where it once held brewer's yeast. (Taping compound buckets from a construction site are not a good idea.)
So here you go...Line your bucket with grape leaves, add several peeled cloves of garlic, some peppercorns, and some fresh dill heads if you have them. Gently add your cukes and add enough brine to cover them with an inch to spare.

Add a weighted plate to keep all the cukes under the brine, and cover with a clean dish towel to keep out dust and bugs. Set in an out of the way place and check them every day to monitor their progress.

The rate at which the pickles cure depends on the temperature at which you are storing them: the warmer the room, the faster they will ferment.

Taste after a few days, they can be eaten at any time. 
I asked the kids if they liked pickles.  He said "yes," and she said "NO."
But when they tried these pickles, guess what...they both liked them.  Perhaps because the pickles don't have the sharpness of a pickle made with vinegar.
In any case, this is a good thing, since the fermented pickle is good for one's digestion and supports the immune system.

Before packing pickles, I cut the larger ones
into spears and chunks.
When the pickles reach the desired sourness, bottle them up and refrigerate to slow the brining process.  Pack the pickles into jars and fill jar with brine from the crock.  Screw cap on tightly.  Store in the refrigerator for up to three months.

Tuesday, June 28, 2011

Lacto-fermented Cauliflower

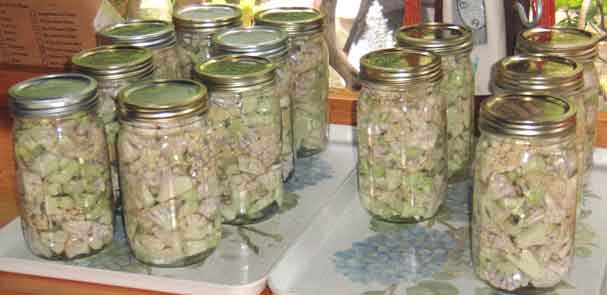
Pickling vegetables by means of lacto-fermentation is one of the easiest of all preserving processes. And best of all, this process keeps the pickles rich in beneficial bacteria. Because this is a brining process, which does not require water-bath canning, the pickles are crunchy, tasty, and good for your digestion.

To make these pickles you will need some wide-mouthed, one-quart sized canning jars, sea salt, and filtered or pure water. (We use our tap water, as we have a well and add no softeners or other additives.)

These annotated pictures illustrate the steps we follow:

Cut cauliflower into bite-sized pieces.


Then pack them tightly into one quart jars.

Add one Tablespoon of salt to each jar.
  
Fill jars with water, leaving about 3/4 inch of headspace,
as the vegetables and their juices expand slightly during fermentation.
Cap the jar tightly, and shake the jar briskly, to distribute the salt throughout the jar.
Store the jars at room temperature for several days, then store jars in a dark, cool spot, ideally at about 40 degrees. (Refrigerate if you expect to store them for a while.)

During the fermentation process, the liquid may get cloudy and bubble, and the jars give off quite a sulfurous odor, so we store ours on the screened porch.

Lacto-fermented vegetables increase in flavor over time, but they may be eaten after the initial room-temperature brining. The cauliflower will have a tangy flavor, reminiscent of the flavor of beer. And, like beer, it is an "acquired taste:" a bit surprising at first, but then quite addictive.

For a complete discussion of the nutritional benefits of lacto-fermentation see the book Wild Fermentation by Sandor Ellix Katz.