Saturday, July 30, 2011

Freezing Beans


As you pick the beans, snap them just below the stem, leaving the stem itself on the plant.  This saves you having to trim the stems off later.

Rinse your beans in cold water, and get rid of all the blossoms.  Then cut them into one inch lengths and follow the instructions for Freezing Broccoli.
Your beans will expand a bit as they freeze,
so pack them fairly loosely in their boxes.

Sunday, July 24, 2011

Out in the garden...

By mid or late July it is a good idea to cruise through the tomato patch on a daily basis.  Not only to pick the ripe tomatoes, but to be on the lookout for invaders.  The invader I'll show you today might come from outer space, or at least from "Alice and Wonderland."
Here are happy tomatoes ripening on the vine.

And here is a tomato with a huge bite taken right out of it!
The culprit, of course is the tomato hornworm.  Perfectly camouflaged, he is hard to find.  But there are clues to his whereabouts.  If you see any of these telltale signs in your garden, keep looking till you find him!  First of all, there is the big bite out of your tomato.  The second sign is skeletonized leaves.  (Descriptive enough?) And third, you will see litle black poops on the leaves right below where he is.


If you are lucky, your hornworm will look like this one.  "Lucky!" you say, "That is completely gross!"  Yes, but this nature.  Not always pretty.
The reason I say that you are lucky is because a predator has found the hornworm even before you did.  She is a parasitic wasp, and the larvae she has deposited on this guy will not only kill him, but will hatch out many more beneficials to protect your future crops.  So, it is important to leave him right where he is.  Disgusting, I know.  Speaking of disgusting...how do you get rid of the hornworm with no parasites??  He is too big to squish!!   A proper burial, I suppose. 

Thursday, July 21, 2011

Solar Magic

A summer heat wave...high humidity too...today is a good day to enjoy a solar shower.  Solar clothes dryer too, for that matter.

Sunshine lights the water droplets
 into blazing rainbow colors

The cool stone floor provides
a grounding connection to the Earth.


Wednesday, July 20, 2011

Small Batch Pickling

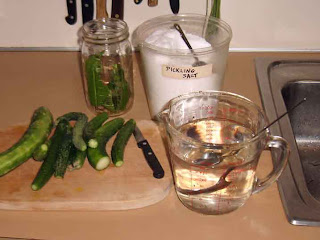
When you have just a few cukes that you'd like to put up, you can use the same method as for the lacto-fermented cauliflower.  Mix up a brine of 2 Tablespoons salt to a quart of water.
Add several grape leaves to the jar to keep the cucumbers crispy.  If you can't find grape leaves, you can substitue other high-tannin leaves such as oak, cherry, or horseradish.
Wild grape leaves
  Pack the jar with cukes.  (Remember to remove the blossom ends and to use only fresh, unblemished cucumbers.)  Add one dill head, a peeled clove of garlic and a few peppercorns.  Fill with brine to 1/4 inch from top of jar.  Be sure all produce is submerged under the brine. Screw on a two piece canning jar lid.  Store in a warm place for four days, then move to the refrigerator to slow the fermentation process.  Ferment will bubble and may overflow a small bit of liquid, so be sure to place your jar on a plate or tray.
Pickles will keep in the refrigerator for up to two months.

Freezing Rraspberries


Freezing raspberries is a bit more tricky than freezing blueberries.  Raspberries are very fragile and require a bit of special attention.

First of all, when picking your berries, don't fill the pail more than three inches deep, or the weight of the top berries may squish the berries below them. 

Once you get them into the house, spread the berries out right away on a tray or coated cookie sheet.  Blueberries continue to ripen for up to twenty four hours after picking.  Raspberries, however, will start to deteriorate once they are picked, so they should be used or frozen as soon as possible.


(Looking down into the chest freezer.) 

I like to flash freeze raspberries by spreading them on a tray or coated cookie sheet and placing them in the chest freezer overnight.

(If you were to just fill a bag with berries, they would mush together and freeze as a solid mass. You would need to thaw the entire contents of the bag at once.) 


The next day, I scoop the berries up off of the trays and seal them in freezer quality bags. 
By flash freezing they maintain their integrity as individual berries, and you can shake out just the quantity you need when you go to use them.
 
 If you spread your raspberries too thickly on the tray, they stick together and are difficult to remove to pack into bags.  Because they are fragile, they tend to break apart when you go to remove them from the tray.
Here I've packed the berries in too tightly and they've
broken apart when I tried to get them off of the tray.
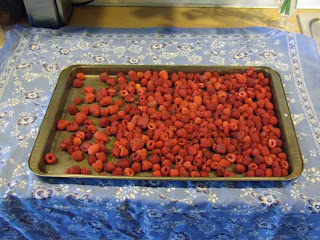
This tray shows a more successful loading of the tray:
one layer thick, whith a bit of space between berries.
Berries will roll off easily.
This type of cheapo cookie pan is NOT a good cjoice.
The juice from the berries reacts with the metal
and makes a black compound that discolors the berries.

Wednesday, July 13, 2011

Lacto fermented pickles


wild grapes
For this pickling project you will need:
A large ceramic crock or food-grade plastic bucket
3-4 pounds fresh cucumbers
8 - 10 grape, oak, black cherry, or horseradish leaves
6 Tablespoons Kosher salt or sea salt
1/2 gallon pure spring or well water (no chlorine or water softeners)
2-3 cloves of garlic, peeled
4-5 heads of fresh dill
1 teaspoon peppercorns

A pickle crock is ideal, of course, but you can also make use of a food-grade plastic bucket. The one you see here is recycled from the Food Co-op, where it once held brewer's yeast. (Taping compound buckets from a construction site are not a good idea.)
So here you go...Line your bucket with grape leaves, add several peeled cloves of garlic, some peppercorns, and some fresh dill heads if you have them. Gently add your cukes and add enough brine to cover them with an inch to spare.

Add a weighted plate to keep all the cukes under the brine, and cover with a clean dish towel to keep out dust and bugs. Set in an out of the way place and check them every day to monitor their progress.

The rate at which the pickles cure depends on the temperature at which you are storing them: the warmer the room, the faster they will ferment.

Taste after a few days, they can be eaten at any time. 
I asked the kids if they liked pickles.  He said "yes," and she said "NO."
But when they tried these pickles, guess what...they both liked them.  Perhaps because the pickles don't have the sharpness of a pickle made with vinegar.
In any case, this is a good thing, since the fermented pickle is good for one's digestion and supports the immune system.

Before packing pickles, I cut the larger ones
into spears and chunks.
When the pickles reach the desired sourness, bottle them up and refrigerate to slow the brining process.  Pack the pickles into jars and fill jar with brine from the crock.  Screw cap on tightly.  Store in the refrigerator for up to three months.

Friday, July 8, 2011

Freezing Blueberries


When picking blueberries, remember to pick the almost ripe berries as well as the beautiful dark blue ones!  (By this I mean the ones with some green on one side, not ones that are small and totally green.)  Aside from allowing a larger harvest, chances are that you will get more berries and the birds will get fewer, as they seem to go for the ripest.


After gathering your berries, spread them out on cookie sheets for inspection.  Pick out any leaves, stems and imperfect berries.  If you have a good number of nearly ripe berries, let them sit for 24 hours, and they will ripen nicely. 

Now put the cookie sheets full of berries in the freezer overnight to flash freeze them.

Then pack them into one quart plastic freezer bags.  Freezing the berries in this manner will allow you to shake out just the quantity you need and return the remainder of the bag to the freezer.

Tuesday, July 5, 2011

Sun Tea

Remember sun tea? Low cost, sugar and caffeine free, mild flavored, but an interesting alternative to water for your daily beverage.

Here's how:

Find yourself a large glass container. (Mine is a commercial sized pickle jar collected from a local pizzaria.)

Go out first thing in the morning and gather some aromatic herbs.  I have here spearmint, lemon verbena, and bee balm,* along with blossoms.

Strip off the leaves and crunch them up with your hands to release their essential oils.  Stuff them in the jar, fill to the top with water, and set out in the sun. Here you see them on the brick patio, an awesome solar collector.

Later on in the day, strain the tea and put the leaves in the compost.  Put the tea in the refrigerator overnight to chill.  This is a mild flavored tea, so best not to dilute it with ice cubes.  Serve with a sprig of fresh spearmint.

* Other names for bee balm are bergamot, and Oswego Tea. Tradition holds that early settlers in Oswego, New York used bergamot tea as a substitute for black tea when the latter was hard to come by.

Monday, July 4, 2011

Blueberry Crisp

Here is a very easy recipe for a great dessert...easier and healthier than a pie:

Blueberry Crisp


4 cups blueberries
2 T. lemon or orange juice
2 T. sugar
1/2 t. dried thyme, preferably orange thyme
water or juice to cover bottom of dish

Topping:
 1 cup rolled oats
1/3 cup toasted wheat germ
1/2 cup whole wheat flour
 1/2 t. salt
2 t. cinnamon
1/3 c. maple syrup
1/2 cup canola oil

Preheat oven to 375'
Mix berries, lemon juice, sugar and thyme in a one and a half quart baking dish.
Mix topping in a bowl and press on top of berries.
Bake 35 - 40"

Enjoy!


Friday, July 1, 2011

Drying Herbs

Since both oregano (above left) and thyme (above right) are perennial herbs, it makes sense to grow them among the perennial flowers.  For peak potency, culinary herbs should be harvested when the flowers are just budded up, but not yet open.  Cut your herbs on a sunny day, after all traces of dew have dried.  
Spread the herbs on cookie sheets and dry away from direct sunlight at about 90 degrees.  An oven with a pilot light is the perfect temperature.  Attic space may also be ideal, but be sure to check the herbs daily.  The texture, thickness, and density of the leaves determines how long they will take to dry. You will probably want to invest in an electric food dehydrator at some point.
After being in the oven for four days, the thyme (upper part of left cookie sheet) is completely dry...

...so I pack it into a clean jar and label it. The oregano is not yet dry enough to pack away: it still has a rubbery texture. But it has shrunk considerably in size, so I consolidate the oregano all on one cookie sheet, and spread some freshly picked basil on the other one and return them to the oven.  (Green basil turns black when dried and is not too appealing, so I like to dry the purple basil and preserve the green basil by making it into pesto.)
Notice the bright green color of the freshly dried herbs.  (When shopping for herbs you can tell how fresh they are by their color.)  Notice also that I don't crumble the leaves into little bits at this point. The goal when packing herbs is to preserve the volatile oils that give them their characteristic flavors.  These oils are released when the leaf is broken, so it is best to crumble the herbs just before adding them to your food.

Two days later the basil is dry and crispy.
Notice how much it has shrunk in size.
Now it's time to break the basil leaves off of the stems and pack them into jars.  Screw the jar lid on tightly and store away from heat and light.  I like to collect recycled jars of different sizes and shapes from the recycle shelves at the local food co-op for storing my home grown herbs.

Freezing Pesto


 Here's my basic set-up for freezing pesto.  Fresh basil leaves, picked off of the stems, extra-virgin olive oil, half-pint freezer boxes, and a food processor.

 I don't prepare the full recipe for pesto at this time.  I just puree the basil in olive oil and freeze.  At serving time, I heat one or two cubes of frozen basil in a double boiler, and add chopped garlic, dried tomatoes, salt and pepper.  I serve Parmesan cheese and walnut pieces at the table to accommodate individual food preferences.  Walnuts make an economical substitute for pine nuts.
 Here's an easy way to save some space in your freezer.  Fill your freezer box just under half way to the fill line
...then, rather than capping each box, stack all of the boxes together, so that the bottom of one box becomes the cover for the box below it. To be sure your box fulls don't stick together, better to fill about 1/4 inch deep so no pesto touches the box above it.
Here I've filled the boxes too full and they ended up stuck together when I went to thaw them out.


Fit a cover snugly on the last box of pesto, and label and date it with a sharpie.

Now bag the entire stack in a plastic bag to ensure adequate protection, and freeze right away.